3 A framework for easily creating beautiful presentations using HTML. [Check out the live demo](http://lab.hakim.se/reveal-js/).
5 reveal.js comes with a broad range of features including [nested slides](https://github.com/hakimel/reveal.js#markup), [markdown contents](https://github.com/hakimel/reveal.js#markdown), [PDF export](https://github.com/hakimel/reveal.js#pdf-export), [speaker notes](https://github.com/hakimel/reveal.js#speaker-notes) and a [JavaScript API](https://github.com/hakimel/reveal.js#api). It's best viewed in a browser with support for CSS 3D transforms but [fallbacks](https://github.com/hakimel/reveal.js/wiki/Browser-Support) are available to make sure your presentation can still be viewed elsewhere.
8 #### More reading in the Wiki:
9 - [Changelog](https://github.com/hakimel/reveal.js/wiki/Changelog): Up-to-date version history.
10 - [Examples](https://github.com/hakimel/reveal.js/wiki/Example-Presentations): Presentations created with reveal.js, add your own!
11 - [Browser Support](https://github.com/hakimel/reveal.js/wiki/Browser-Support): Explanation of browser support and fallbacks.
15 Slides are written using HTML or markdown but there's also an online editor for those of you who prefer a more traditional user interface. Give it a try at [www.rvl.io](http://www.rvl.io).
22 Markup heirarchy needs to be ``<div class="reveal"> <div class="slides"> <section>`` where the ``<section>`` represents one slide and can be repeated indefinitely. If you place multiple ``<section>``'s inside of another ``<section>`` they will be shown as vertical slides. The first of the vertical slides is the "root" of the others (at the top), and it will be included in the horizontal sequence. For example:
27 <section>Single Horizontal Slide</section>
29 <section>Vertical Slide 1</section>
30 <section>Vertical Slide 2</section>
38 It's possible to write your slides using Markdown. To enable Markdown, add the ```data-markdown``` attribute to your ```<section>``` elements and wrap the contents in a ```<script type="text/template">``` like the example below.
40 This is based on [data-markdown](https://gist.github.com/1343518) from [Paul Irish](https://github.com/paulirish) which in turn uses [showdown](https://github.com/coreyti/showdown/). This is sensitive to indentation (avoid mixing tabs and spaces) and line breaks (avoid consecutive breaks).
43 <section data-markdown>
44 <script type="text/template">
47 A paragraph with some text and a [link](http://hakim.se).
55 At the end of your page you need to initialize reveal by running the following code. Note that all config values are optional and will default as specified below.
59 // Display controls in the bottom right corner
62 // Display a presentation progress bar
65 // Push each slide change to the browser history
68 // Enable keyboard shortcuts for navigation
71 // Enable the slide overview mode
74 // Loop the presentation
77 // Number of milliseconds between automatically proceeding to the
78 // next slide, disabled when set to 0, this value can be overwritten
79 // by using a data-autoslide attribute on your slides
82 // Enable slide navigation via mouse wheel
85 // Apply a 3D roll to links on hover
89 transition: 'default' // default/cube/page/concave/zoom/linear/none
95 Reveal.js doesn't _rely_ on any third party scripts to work but a few optional libraries are included by default. These libraries are loaded as dependencies in the order they appear, for example:
100 // Syntax highlight for <code> elements
101 { src: 'lib/js/highlight.js', async: true, callback: function() { window.hljs.initHighlightingOnLoad(); } },
102 // Cross-browser shim that fully implements classList - https://github.com/eligrey/classList.js/
103 { src: 'lib/js/classList.js', condition: function() { return !document.body.classList; } }
104 // Interpret Markdown in <section> elements
105 { src: 'lib/js/data-markdown.js', condition: function() { return !!document.querySelector( '[data-markdown]' ); } },
106 { src: 'lib/js/showdown.js', condition: function() { return !!document.querySelector( '[data-markdown]' ); } },
107 // Zoom in and out with Alt+click
108 { src: 'plugin/zoom-js/zoom.js', condition: function() { return !!document.body.classList; } },
109 // Speaker notes support
110 { src: 'plugin/speakernotes/client.js', async: true, condition: function() { return window.location.host === 'localhost:1947'; } },
111 { src: '/socket.io/socket.io.js', async: true, condition: function() { return window.location.host === 'localhost:1947'; } },
116 You can add your own extensions using the same syntax. The following properties are available for each dependency object:
117 - **src**: Path to the script to load
118 - **async**: [optional] Flags if the script should load after reveal.js has started, defaults to false
119 - **callback**: [optional] Function to execute when the script has loaded
120 - **condition**: [optional] Function which must return true for the script to be loaded
125 The Reveal class provides a minimal JavaScript API for controlling navigation and reading state:
129 Reveal.slide( indexh, indexv );
136 Reveal.toggleOverview();
138 // Retrieves the previous and current slide elements
139 Reveal.getPreviousSlide();
140 Reveal.getCurrentSlide();
142 Reveal.getIndices(); // { h: 0, v: 0 } }
147 If you set ``data-state="somestate"`` on a slide ``<section>``, "somestate" will be applied as a class on the document element when that slide is opened. This allows you to apply broad style changes to the page based on the active slide.
149 Furthermore you can also listen to these changes in state via JavaScript:
152 Reveal.addEventListener( 'somestate', function() {
153 // TODO: Sprinkle magic
159 The 'ready' event is fired when reveal.js has loaded all (synchronous) dependencies and is ready to start navigating.
162 Reveal.addEventListener( 'ready', function( event ) {
163 // event.currentSlide, event.indexh, event.indexv
167 ### Slide change event
169 An 'slidechanged' event is fired each time the slide is changed (regardless of state). The event object holds the index values of the current slide as well as a reference to the previous and current slide HTML nodes.
172 Reveal.addEventListener( 'slidechanged', function( event ) {
173 // event.previousSlide, event.currentSlide, event.indexh, event.indexv
179 When a slide fragment is either shown or hidden reveal.js will dispatch an event.
182 Reveal.addEventListener( 'fragmentshown', function( event ) {
183 // event.fragment = the fragment DOM element
185 Reveal.addEventListener( 'fragmenthidden', function( event ) {
186 // event.fragment = the fragment DOM element
192 It's easy to link between slides. The first example below targets the index of another slide whereas the second targets a slide with an ID attribute (```<section id="some-slide">```):
195 <a href="#/2/2">Link</a>
196 <a href="#/some-slide">Link</a>
199 Just press »F« on your keyboard to show your presentation in fullscreen mode. Press the »ESC« key to exit fullscreen mode.
203 Presentations can be exported to PDF via a special print stylesheet. This feature requires that you use [Google Chrome](http://google.com/chrome).
204 Here's an example of an exported presentation that's been uploaded to SlideShare: http://www.slideshare.net/hakimel/revealjs-13872948.
206 1. Open your presentation with [css/print/pdf.css](https://github.com/hakimel/reveal.js/blob/master/css/print/pdf.css) included on the page. The default index HTML lets you add *print-pdf* anywhere in the query to include the stylesheet, for example: [lab.hakim.se/reveal-js?print-pdf](http://lab.hakim.se/reveal-js?print-pdf).
207 2. Open the in-browser print dialog (CMD+P).
208 3. Change the **Destination** setting to **Save as PDF**.
209 4. Change the **Layout** to **Landscape**.
210 5. Change the **Margins** to **None**.
213 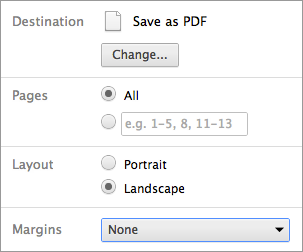
217 If you're interested in using speaker notes, reveal.js comes with a Node server that allows you to deliver your presentation in one browser while viewing speaker notes in another.
219 To include speaker notes in your presentation, simply add an `<aside class="notes">` element to any slide. These notes will be hidden in the main presentation view.
221 It's also possible to write your notes with Markdown. To enable Markdown, add the ```data-markdown``` attribute to your note ```<aside>``` elements.
223 You'll also need to [install Node.js](http://nodejs.org/); then, install the server dependencies by running `npm install`.
225 Once Node.js and the dependencies are installed, run the following command from the root directory:
227 node plugin/speakernotes
229 By default, the slides will be served at [localhost:1947](http://localhost:1947).
231 You can change the appearance of the speaker notes by editing the file at `plugin/speakernotes/notes.html`.
235 - The notes page is supposed to show the current slide and the next slide, but when it first starts, it always shows the first slide in both positions.
238 - **css/** Core styles without which the project does not function
239 - **js/** Like above but for JavaScript
240 - **plugin/** Components that have been developed as extensions to reveal.js
241 - **lib/** All other third party assets (JavaScript, CSS, fonts)
247 Copyright (C) 2011-2012 Hakim El Hattab, http://hakim.se